Mapping Tool
The mapping tool in the Data Layer interface allows the user to map nodes and properties for easier management of data and ontologies. This section provides instructions for using the Mapping tab in Graphmart's Data Layers to add object mappings in your models.
See the topic Loading Data for instructions on loading data into layers. Once the data has been ingested, the model is generated. If you make any changes to the layer sources, make sure you regenerate the model when the layer is reloaded.
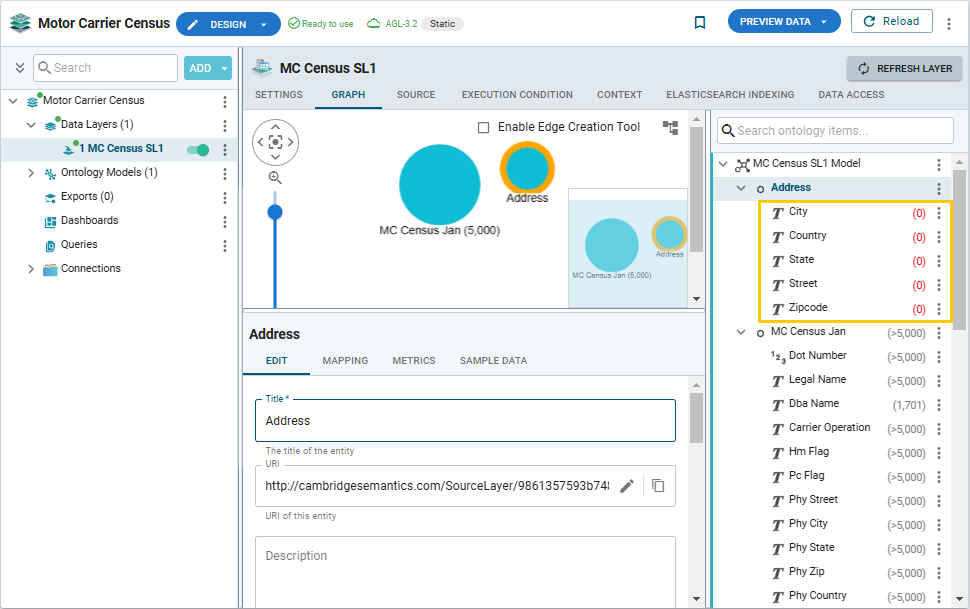
Go to the Graph tab of the data layer screen. The right pane shows the model generated from the data layer. Expand the model to view its classes and their properties. Select the top level by clicking the model name.
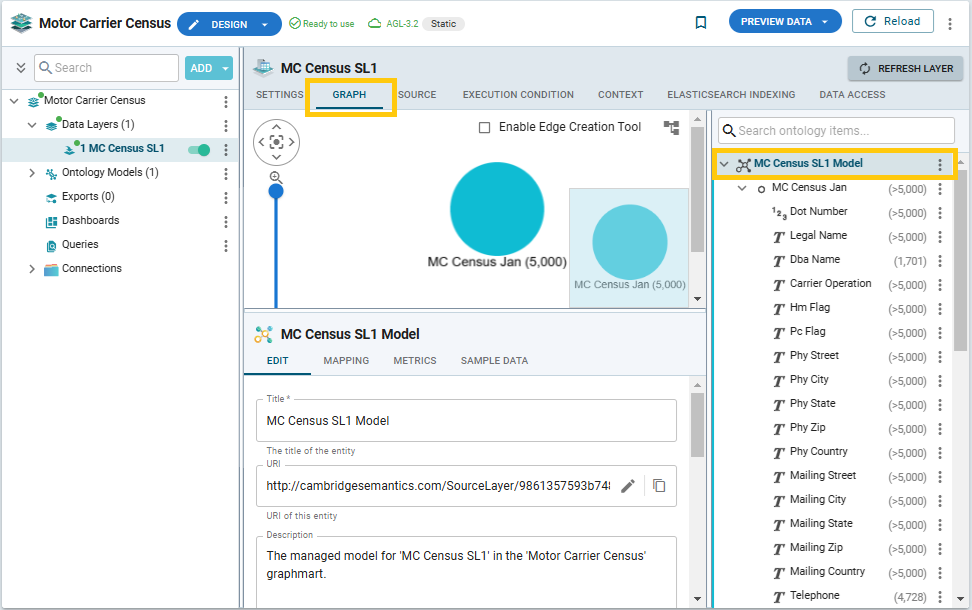
In the right pane, expand the model and the classes you wish to explore and whose properties you may need to modify.
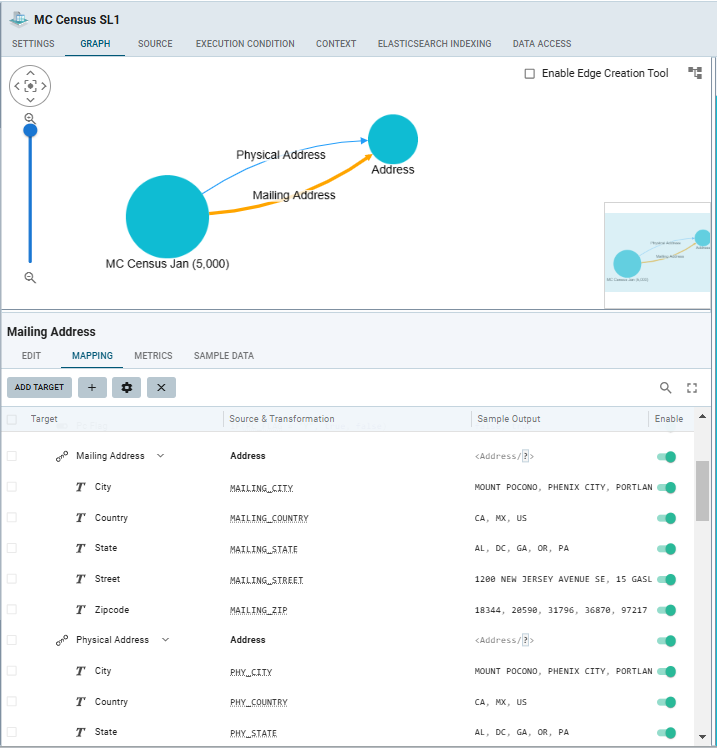
Note: The instance count (>5000) is shown because the Preview Data option is selected by default. If you do a full load of the dataset, the actual counts will be displayed.
A typical workflow involving the use of the mapping tool is presented below.
To modify the names or types of some properties for your final model, you may first need to create a new class to hold the new properties. In this example, suppose you would like to modify the names of the address components for physical and mailing address. You can collapse those components by adding an Address class and reuse this common class across those properties.
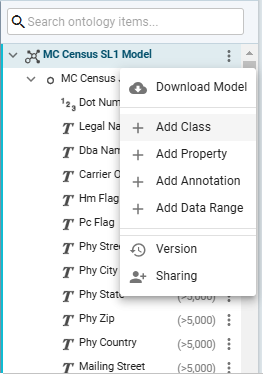
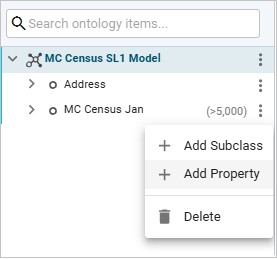
Start editing the model by clicking its menu (the dots to the right of the model name in the top row) and select Add Class.
The Create New Class dialog opens. Specify a title in the Title field and include an optional description in the Description field.
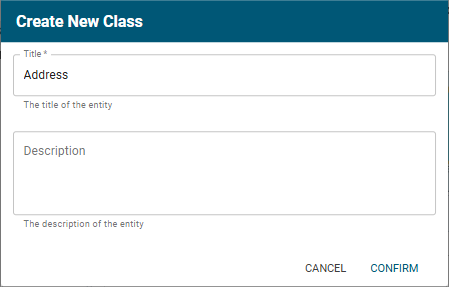
Click Confirm. The new class is shown at the top of the right pane and in the diagram.
Start creating the required properties under the new class. Clicking the menu for the new class and select Add Property. For example, since we want to collapse Mailing Street and Phy Street into one, create the Street property:
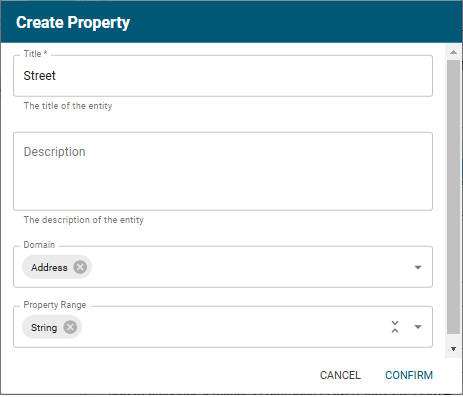
The new property is created and displayed under the Address class. Create other general properties of the Address class in the same way (e.g., City, State, Zipcode, Country) meant to serve as collapsed mailing and physical address properties:
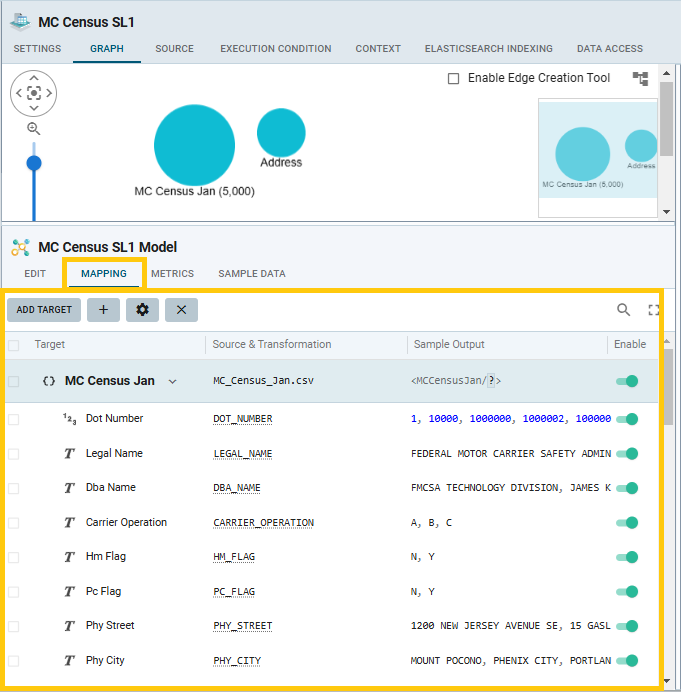
Click the model item at the top of the right pane. Go to the Mapping tab in the model profile (the middle frame). The original MC Census Jan mapping is shown. Expand it to view the properties:
Note: If the Sample Output column is not populated, you may have made changes to the original source definitions and re-ingested them without reloading. In this case, go back to Layer Sources and reload those sources, so that they get resampled.
Review the data types and the sample data and make the desired adjustments to the generated model.
For example, the data type of binary properties Hm Flag and Pc Plag is currently String. You can convert them to Boolean by double-clicking in the Source & Transformation field and specifying the appropriate transformation: IF (HM_FLAG="Y", true, false). Note that context-sensitive syntax help and warnings are provided as you type expressions in the Source & Transformation field.
![]()
Then double-click on the Target field name. The Mapping Details screen opens. Change Property Type from string to boolean. Click Save.
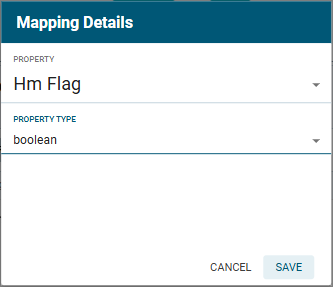
Both fields are defined as Boolean now:

To factor all these address-related target properties into the Address class created previously, click the menu of the original class (MC Census Jan) in the right pane. From the menu, select Add Property.
The Create Property screen opens. Specify the Title ("Physical Address" in this example). For Property Range, we can now select the new Address class.
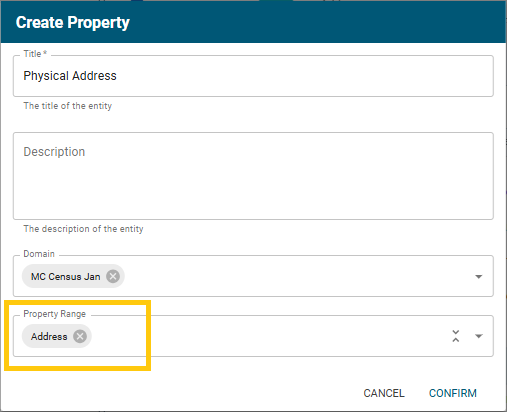
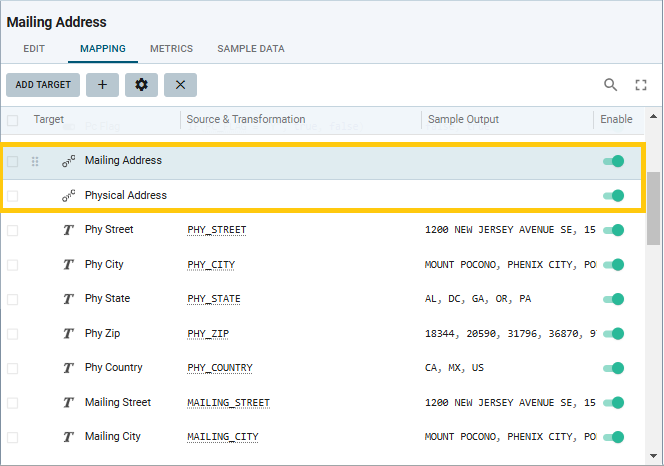
Click Confirm. The new property appears under the original class in the right pane. Use the same steps to add the Mailing Address property with Address range to the original class. Both added properties are labeled with the mapping icon:
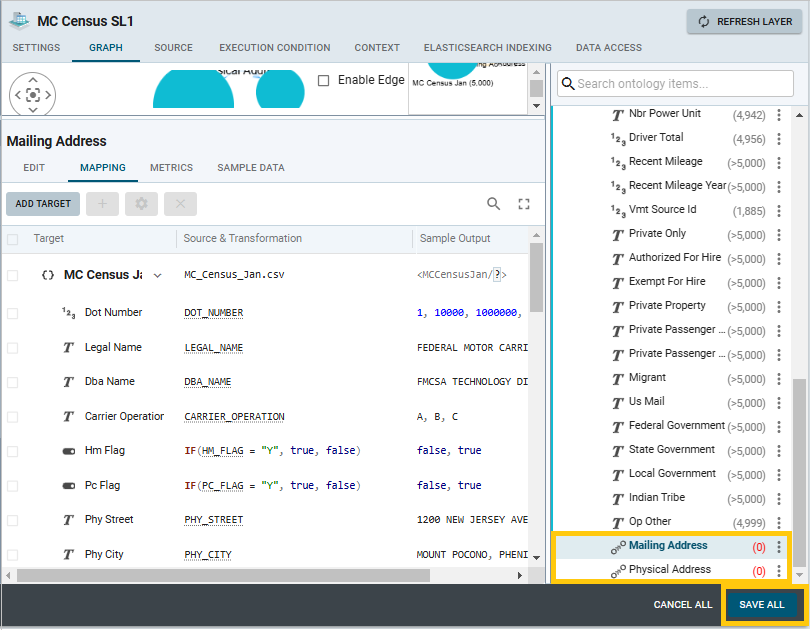
Click the Save All button at the bottom right corner, then click Refresh.
Now you can add mappings in the Mapping tab. Click on any row in the Mapping frame and click the + button (Add Mapping) in its toolbar. The Add Mapping dialog opens:
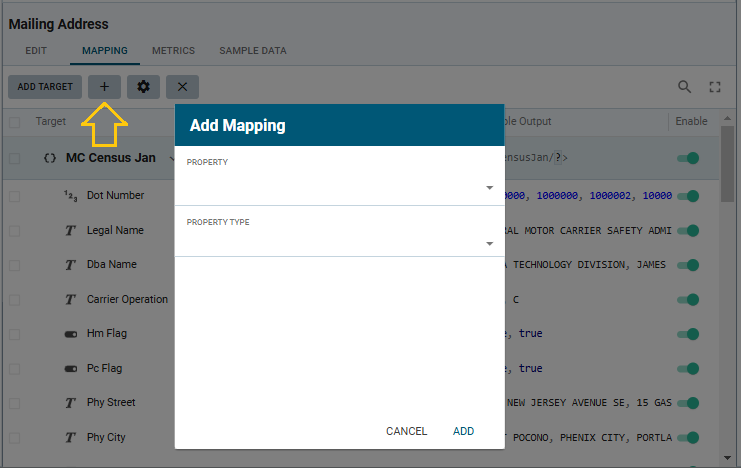
Select Physical Address for Property. Select Address for Property Type. (Tip: Start typing and use the auto-complete feature).
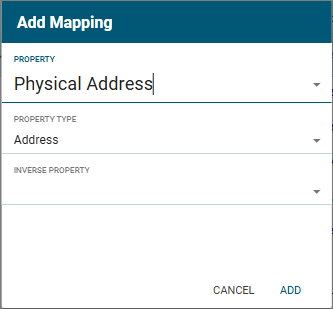
Click Add.
Use the same steps to add the mapping for Mailing Address.
The new mappings appear at the bottom of the list. You can drag them up to the desired position closer to the top. The dragging feature is available for convenient grouping and ordering. Note that the order affects the ontology, as each of those predicates will be annotated with a display priority (honored in the Model pane on the right).
Click Save All, then click Refresh.
Double-click in the Source & Transformation field for Mailing Address. Alternatively, select the Mailing Address row and click the gear icon in the toolbar of the Mapping tab. The Mapping Details screen opens. Edit the mapping:
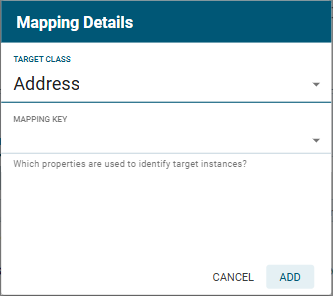
Associate it with the Address target class (thus configuring Mailing Address as an object mapping). Defining the mapping key is not necessary in this case. Click Add.
Perform the same steps to edit mapping details for Physical Address.
![]()
Add the previously created properties under the new mappings: Select each of the mappings and click the + button (Add Mapping), then add the new properties one by one (in this example: Street , Zipcode, City, State, Country).
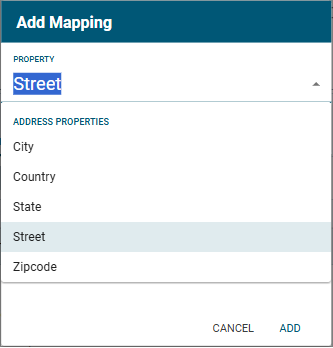
Click Add.
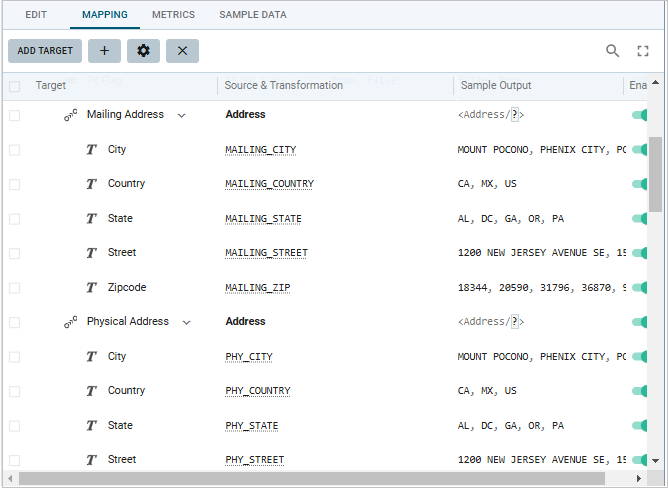
Then edit the properties added under the mappings: Click in the Source & Transformation field, select the right source field names. (Tip: Type and use the auto-complete feature for convenience.)
![]()
Delete the original mappings. To delete them in bulk, select the checkboxes on the left, then click the x button in the toolbar of the Mapping frame.
Click Save All, then Refresh.
The new mappings have been defined:
Note: If you change the expression in the Source & Transformation field, it will also change synchronously in the values in the Sample Output field.
Save all changes by clicking Refresh and then Reload. The model graph is updated.
If you use the Add Source Data button to add more files to your data source or, in the case of a database source, to add more tables with the same structure to the data that's been onboarded, the mappings you defined will apply automatically.