Linux
A compatible NVIDIA graphics driver (version 450.80.02 or newer) must be installed on Linux operating systems. CUDA-enabled GPUs with compute capabilities of 3.5 or higher are supported. A specifically tuned build of Open MPI is bundled in the installation and will be used for running nanoFluidX.
Single Node
After installation at <INSTALL_DIR>, follow these steps to verify
nanoFluidX has been installed correctly.
- Login as a regular user. Do not use root user.
-
Set environment source to:
<INSTALL_DIR>/altair/hwcfdsolvers/nanofluidx/linux64/set_nFX_environment.sh -
Run system tests with the following:
system_tests.py -
A successful test on a multi-GPU node will produce output similar to the
following:
Figure 1. 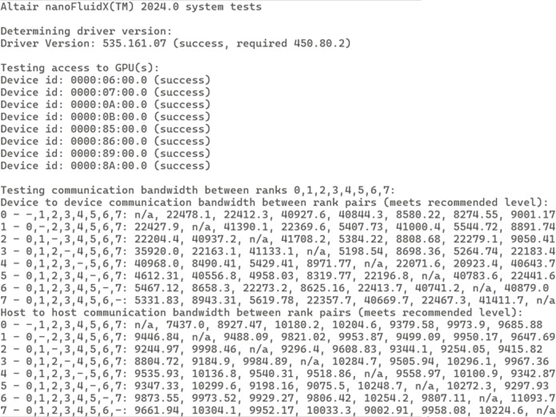
-
Copy
dambreakcase fromdemo_casesto the location of choice:<LOC>: cp <INSTALL_DIR>/ altair/hwcfdsolvers/nanofluidx/linux64/demo_cases/dambreak <LOC>/dambreak. -
Change directory to
<LOC>: cd <LOC>. -
Run the following:
nanoFluidX:nfxmpirun_singlenode -np 1 $nFX_SP -i dambreak_3D_H300_dx0p005_wt.cfg -m 10 -
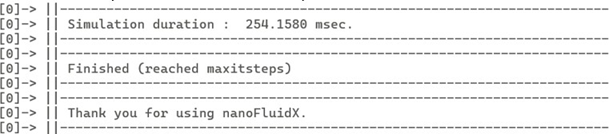
The test run is successful when the message
Finished (reached maximum
                        steps)
appears at the end.Note: Simulation time may vary.Figure 2. 
Multi Node
After installation at <INSTALL_DIR> on each node, test the
installation on each node separately. In addition, follow these steps to verify nanoFluidX has been installed correctly for multi-node
operation.
- Login as a regular user. Do not use root user.
-
Set environment source to:
<INSTALL_DIR>/altair/hwcfdsolvers/nanofluidx/linux64/ set_nFX_environment.sh multinode -
Copy
dambreakcase from demo_cases to the location of choice$LOC: -
Change directory to
<LOC>: cd <LOC> -
Run the following:
nanoFluidX: nfxmpirun_multinode --hostfile HOSTFILE -np X $nFX_SP -i dambreak_3D_H300_dx0p005_wt.cfg -m 10-
Use a suitable
HOSTFILEwhere each node is repeated once per GPU on the node. - Set X equal to the number of GPUs across all nodes.
-
Use a suitable
-
The test run is successful when the message
Finished (reached maximum
                        steps)
appears at the end.Figure 3.