Custom Inputs: Nodal Hook
Tutorial Level: Advanced In this tutorial, you will use custom nodal input variables (such as varying nodal and elemental forces, boundary loads, and so on) for training.
- The nodal coordinates and part IDs are automatically from the .h3d (or equivalent result) files provided. The coordinates are default inputs to the PhysicsAI model. The part IDs can be enabled by selecting the box next to it.
- If select native decks are available, the thickness and material IDs are automatically parsed. For information about supported decks, see Frequently Asked Questions.
- A nodal property defined on select nodes such as applied forces and constraints can be input through a .csv file with the same name and in the same location as each of the .h3d files. The nodal_hook.py python script is needed to read the .csv files.
The detailed instructions for each of these cases are provided in this tutorial.
- Default Inputs Imported from h3d
- If only .h3d files are provided, the nodal coordinates
and part ID are imported by default. Only the nodal coordinates are enabled
by default.
Figure 1. Default 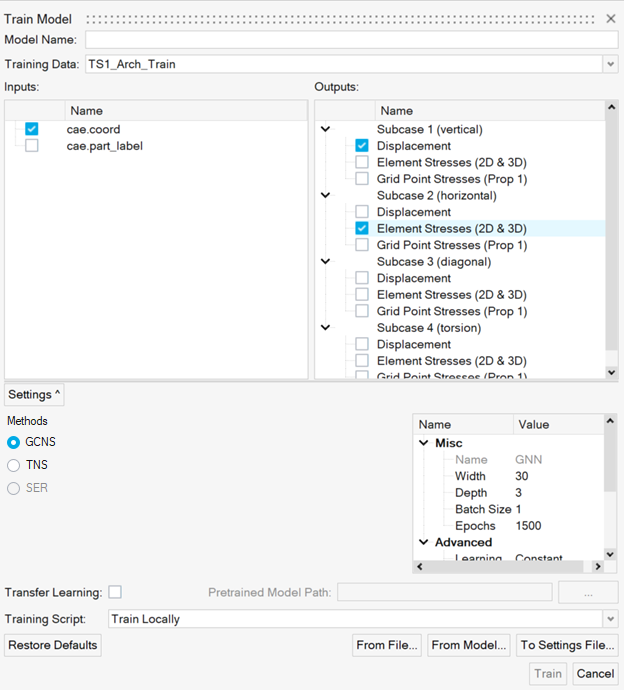
- Natively read in thickness and material IDs
- If select native decks are available in addition to the .h3d files, the thicknesses and material IDs are automatically parsed. The native decks should share the name with the corresponding .h3d files.
Use Nodal Hook
For properties which are applied on selected nodes (such as forces or constraints) or to all nodes with varying values (such as distributed loads) within a model, the nodal hook should be used.
-
Open the nodal_inputs folder.
Inside the training_files folder, there are 20 .h3d files named run__0000X_gfem_wing.h3d and 20 .csv files named run__0000X_gfem_wing.csv files. Each .csv file contains a list of nodes and the values of the four custom inputs (applied forces in the X, Y, Z directions and the single point constraints) along with a header row.
Figure 2. Nodal Property Inputs 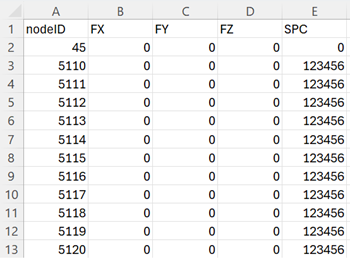
-
Create a new project called nodal_inputs.
-
From the PhysicsAI ribbon, select the
Create Project tool.
Figure 3. 
-
From the PhysicsAI ribbon, select the
Create Project tool.
- Copy the nodal_inputs_hook.py file into the _hooks folder inside the project folder.
-
Create a new dataset using all the samples and name it Wing.
-
From the PhysicsAI ribbon, select the
Create Dataset tool.
Figure 4. 
The Create Dataset dialog opens. -
For File System, click
 and navigate to
the training_files folder.
and navigate to
the training_files folder.
-
Select the Enable train test split check box and
verify 80 is defined for Train %.
Figure 5. 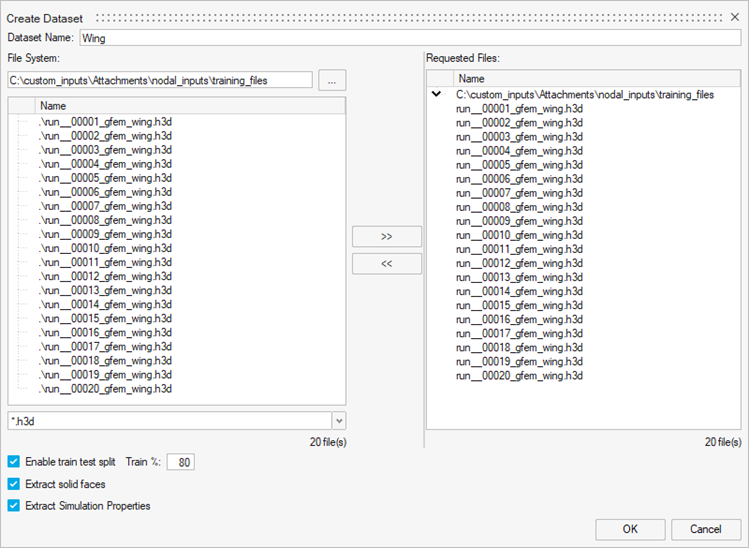
-
From the PhysicsAI ribbon, select the
Create Dataset tool.
-
Train the model.
-
From the PhysicsAI ribbon, select the
Train an ML Model tool.
Figure 6. 
The Train Model dialog opens. -
Click Train.
Figure 7. Global Property Inputs 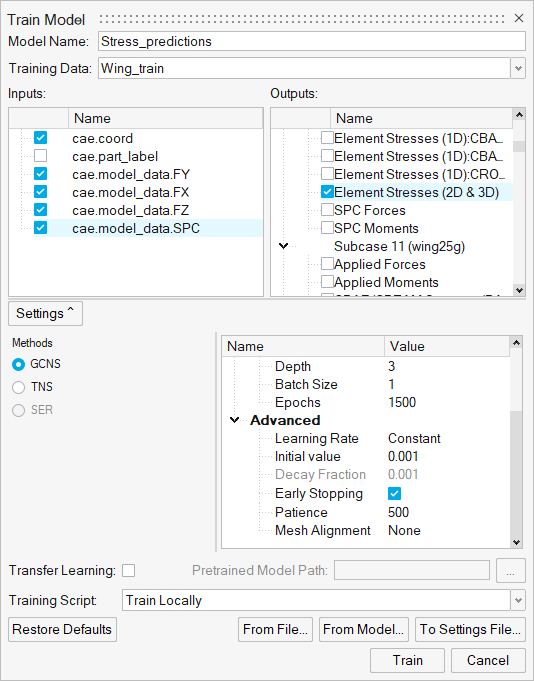
The Model Training dialog opens.Tip: Once the status changes to Running, you can click Show Log view the training logs.
-
From the PhysicsAI ribbon, select the
Train an ML Model tool.
-
Test the model.
Ensure that the associated .csv files are also present while creating the test dataset.
-
Once the testing is complete, set the model to active.
Important: Setting a model as active will checkout a stacking license until the model is deactivated.
-
From the PhysicsAI ribbon, select the
Manage ML Models tool.
Figure 8. 
The Model Training dialog opens.
-
From the PhysicsAI ribbon, select the
Manage ML Models tool.
Note that only the nodes with one or more features defined on them are required in the .csv file. However, it is necessary that each node in the .csv file should have a value for all the input features. For example, in Figure 2, node 5110 does not have any forces defined and hence a value of 0 is used as a placeholder in columns FX, FY and FZ. In other words, the rectangular/tabular structure of the input data should be maintained.