Tutorial Level: Advanced In this tutorial, you will learn how to use the expertAI tools in Design Explorer by running two optimizations. the first a standard
solver-based optimization, and the subsequent one through expertAI to allow for subjective
criteria to be considered in the optimization.
Before you begin, copy the file(s) used in this tutorial to your working directory:
From the menu bar, click File > Open > HyperMesh Model.
Browse to your working directory, select clip.hm, and
click Open.
If prompted, click Change to change the solver
interface to OptiStruct while opening the
model.
A finite element model appears in the modeling window.
Figure 1.
Create an Exploration
From the Design Explorer ribbon, Exploration tool group, click the
Create Explorations tool.
Figure 2.
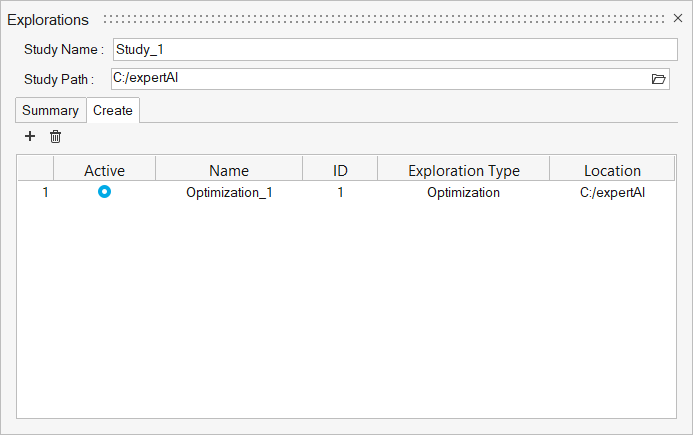
The Explorations dialog opens.
Click
then select Optimization.
In the Study Path field, browse to and select the folder to store your
exploration files.
Figure 3.
Close the Explorations dialog.
From the Exploration tool group, click the Design
Explorer tool.
Figure 4.
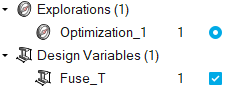
The Design Explorer browser opens. You can see the newly created
optimization exploration. Additional exploration entities will appear here as
well.
Create the Exploration Inputs
From the Design Explorer ribbon, click the Gauge
tool.
Figure 5.
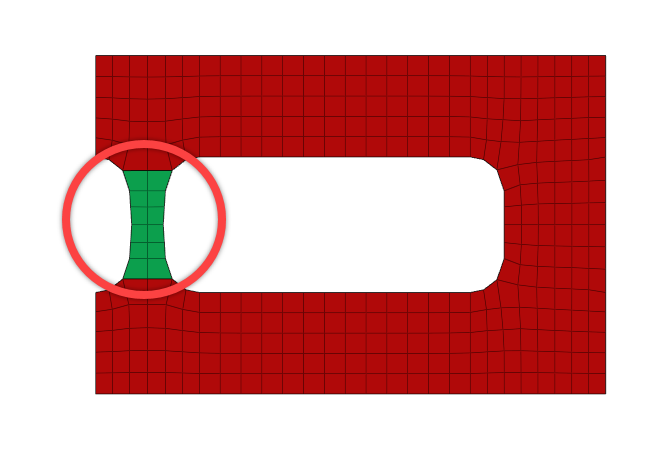
In the modeling window, select the
Fuse property of the main clip.
Figure 6.
In the microdialog, change the lower and upper bound
percentages to 50.
Figure 7.
Click Create.
One gauge design
variable is created.Figure 8.
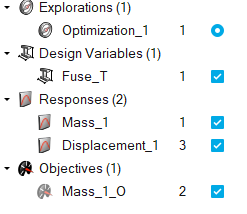
Create the Exploration Responses
From the Design Explorer ribbon, click the Mass/Volume
tool.
Figure 9.
On the guide bar, click to create the response.
In the microdialog, change the drop-down option from
Response to Objective.
An objective is created.
On the guide bar, click .
From the Design Explorer ribbon, click the Disps.
tool.
Figure 10.
On the guide bar, click to open
the Advanced Selection dialog.
In the Advanced Selection dialog, select By
ID, enter 904, and click
OK.
A displacement response is created.
On the guide bar, click .
The optimization
now consists of one design variable, two response variables, and one objective.Figure 11.
Evaluate the Exploration
From the Design Explorer ribbon, Evaluate tool group, click the
Evaluate tool.
Figure 12.
The Evaluate dialog opens.
Change the No. of Runs to 10.
Optional: Increase the number of concurrent runs by increasing the Multi Execution
number.
Click Run.
The optimization is evaluated. In this case, there will be a nominal run
plus ten optimization runs. This may take a few minutes depending on your
computer.
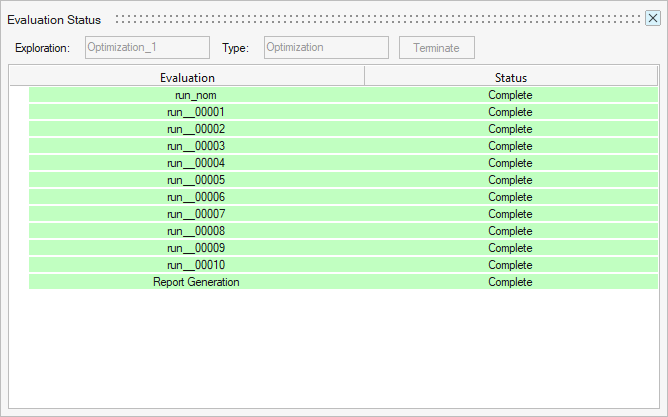
When the evaluation is complete, the Evaluation
Status dialog should look like Figure 13.
Figure 13.
Close the Evaluation Status dialog.
Review the Evaluation
From the Design Explorer ribbon, Evaluate tool group, click the
Results Explorer tool.
Figure 14.
The Results Explorer Browser opens.
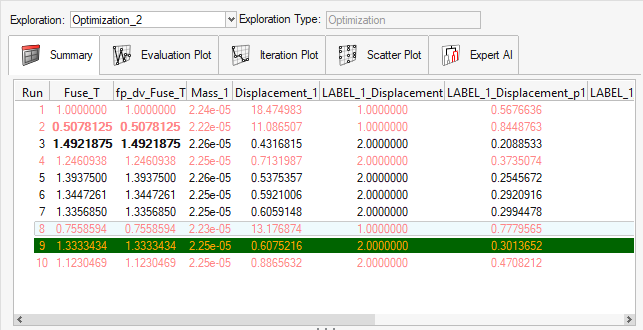
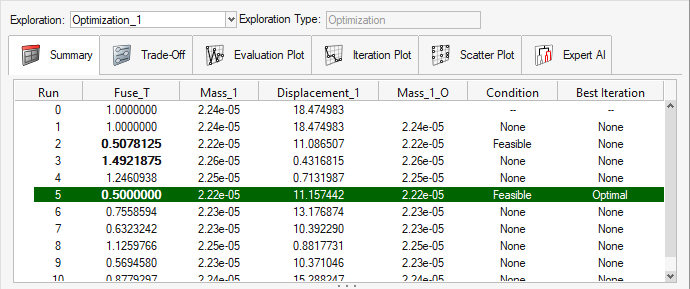
Review the Summary table, which shows the input and response values for each
run of the optimization, including the optimal run, in green.
Figure 15.
Right-click on the optimal run, run 5, and select Load
Results from the context menu.
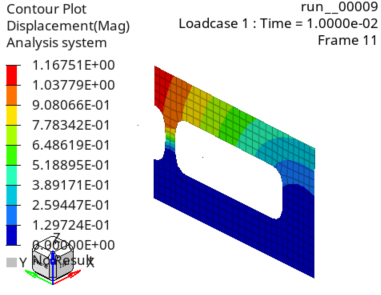
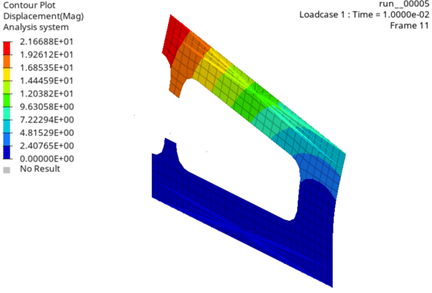
The results are loaded into
a HyperView window, shown in Figure 16 when set
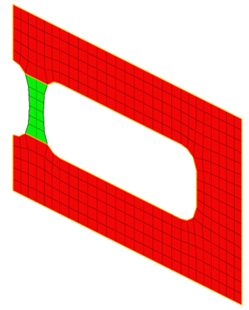
to the final timestep.Figure 16. We have achieved our optimization objective to minimize the mass of the clip.
However, the resulting breakage shown in Figure 16 is
undesirable. We would like to meet our objective while trying to ensure that the clip
does not break.
Expert Emulation
If it's not the active client, make the original HyperMesh window active, and return to the Results
Explorer Browser.
In the Results Explorer Browser, select the Expert AI
tab.
Next to the Dataset drop-down, click .
A clustering report is generated from the original
optimization.
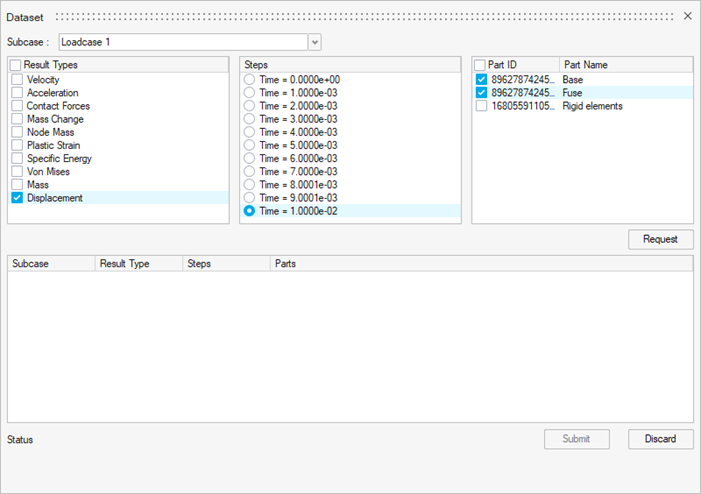
In the Dataset dialog, make the following selections, as
shown in Figure 17.
For Result Type, select Displacement.
For Steps, select 1.0000e-02.
For Part ID, select Base and
Fuse.
Figure 17.
Click Request.
The dataset is created.
Click Submit.
Using unsupervised machine learning, the results from the original
optimization have been clustered by their displacements.
You can select either
cluster to see which optimization runs it contains.
In the Results Explorer Browser, right-click in the area beneath the two
clusters and select Animate all Clusters from the
context menu.
A new page is created containing animations, one for each cluster. Each
animation cycles through the displacements for each run in a given cluster.Figure 18.
Click to animate the
windows and cycle through the runs.
Cluster 1 contains all the runs resulting in a broken clip. Cluster 2 contains
all the runs where the clip remains intact.
Click to stop the
animations.
Return to Page 1, make the HyperMesh window active,
and return to the Results Explorer tab.
Beneath the cluster area, click Train Classifier.
A classifier is trained where we can supervised machine learning, based on our
previous observations of the clusters.
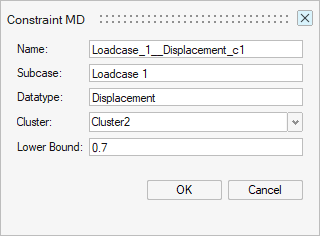
Right-click on the classifier, and select Create
Constraint from the context menu.
In the Constraint dialog, select
Cluster2 for Cluster.
For Lower Bound, enter 0.7 and click OK.
Figure 19.
A constraint is created.
Click Optimize, and select
Solver-Based.
The Evaluate dialog opens.
Change the No. of Runs to 10.
Optional: Increase the number of concurrent runs by increasing the Multi Execution
number.
Click Run.
The optimization is evaluated. In this case, there will be a nominal run
plus ten optimization runs. This may take a few minutes depending on your
computer.
When the evaluation is complete, the Evaluation
Status dialog should look like Figure 20.Figure 20.
Close the Evaluation Status dialog.
Review the Evaluation
From the Design Explorer ribbon, Evaluate tool group, click the
Results Explorer tool.
Figure 21.
The Results Explorer Browser opens.
Ensure that Optimzation_2 is the selected exploration,
and review the Summary table, Figure 22, which shows the optimal run, minimizing the mass of the click while also
conforming to the constraint that the clip does not break.
Figure 22. Figure 22 shows the loaded results for the optimal run, confirming that the clip is not
broken.Figure 23.

 then select Optimization.


 to create the response.
 .
.

 to open
the Advanced Selection dialog.
to open
the Advanced Selection dialog.


 to animate the
windows and cycle through the runs.
Cluster 1 contains all the runs resulting in a broken clip. Cluster 2 contains all the runs where the clip remains intact.
to animate the
windows and cycle through the runs.
Cluster 1 contains all the runs resulting in a broken clip. Cluster 2 contains all the runs where the clip remains intact. to stop the
animations.
to stop the
animations.